
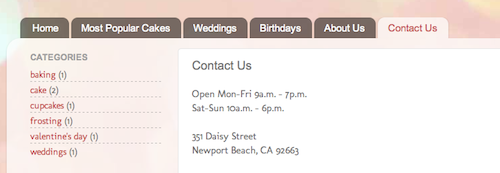
Blogger Pages lets you to publish static information on stand-alone pages linked from your blog. For example, you can use Pages to create an About This Blog page that discusses the evolution of your blog, or a Contact Me page that provides directions, a phone number, and a map to your location.
 You create a page similar to how you write a blog post. Click Edit Posts | Edit Pages tab, then click New Page.
 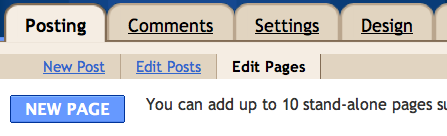 If you're using our upgraded interface, click on the drop-down menu next to the gray Post List icon, and scroll down to Pages. You can create up to 10 pages.
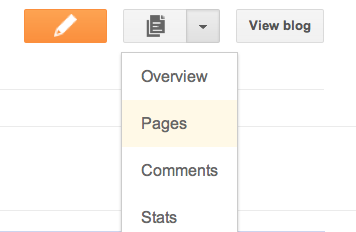 In the Pages gadget, you can decide which pages will have links, and in what order they will appear. You can also choose whether or not you want links automatically created for pages when you create them by checking or unchecking the box to the left of Add New Pages by Default.
  For information on how to add a gadget to your blog, visit Adding a Gadget.
Making Custom Templates Compatible With Pages Tabs
If you're familiar with HTML and want Pages as tabs, follow these steps carefully (caution - this is not for the faint of heart!):- Make sure the Pages Widget hasn't already been added, if so, remove the widget
- Go to the Design | Edit HTML tab for your blog
- Download a backup of your template by clicking Download Full Template
- Click the checkbox next to Expand Widget Templates
- Look for the following three lines of HTML. If this HTML exists, change showaddelement='no' to showaddelement='yes'
- If this HTML does not exist, paste the following lines of HTML where you want the tabs to appear (for instance, after <div id='content-wrapper'>)
- Confirm tabs are correctly added, click Save Template
- Go to Design | Page Elements and look for the new horizontal Gadget area and add the Pages gadget there.
<div id='crosscol-wrapper' style='text-align:center'>
         <b:section class='crosscol' id='crosscol' showaddelement='no'/>
   </div>
<div id='crosscol-wrapper' style='text-align:center'>
         <b:section class='crosscol' id='crosscol' showaddelement='yes'/>
       </div>
Tidak ada komentar:
Posting Komentar